Salesforce Security Best Practices: Threat Update & Proactive Protection Tips

Summary
Below are actionable, high-impact steps your team should take to reduce risk and protect your data.
At Wolfic, safeguarding your Salesforce environment is a top priority. In response to an ongoing wave of sophisticated phishing and social engineering attacks targeting Salesforce customers, we are issuing these proactive security recommendations. While Salesforce's core platform remains secure, these external threats exploit end-user behavior and configuration gaps.
What’s Happening?
Salesforce Security has identified an ongoing threat campaign involving phone-based social engineering.
Attackers are impersonating IT support teams and tricking users or third-party contractors into visiting malicious login pages or installing deceptive connected apps. In several cases, attackers deployed tampered versions of tools like the Salesforce Data Loader to exfiltrate data after gaining access. These attacks rely entirely on user manipulation and misconfigured settings.

Proactive Protection Tips
Get a Backup App
This is the single most important tip. Even if you don’t do anything else, this one action can save you like nothing else can.
Do not rely on native .CSV data “backups”. They provide a false sense of security.
If you’ve ever tried to perform a bulk import through Dataloader.io using a .CSV file, you know how challenging it can be when everything doesn’t line up perfectly.
Now imagine trying to do this for every single record in your org, while everyone is freaking out.
Salesforce pushes their latest acquisition Own Backup, but Wolfic can get you an even better tool for 33% less. Just ask!
Limit Who Can Export Your Data Using Reports
Not everyone needs this ability, and some may use it to export valuable data “just in case’ they get fired or decide to leave.
To manage this, check Setup > Profiles > choose one > click System Permissions > Edit > search for “Export” > uncheck the box for “Export Reports” > click Save. Repeat for each Profile that is assigned to an active User.
Pro tip: If someone asks to be able to export, see if you can instead subscribe them to the report. That way they get it in their email on a recurring basis, but can’t modify and export it anytime they want.
If someone who is not a System Administrator needs to export reports, grant them the permission using a Permission Set instead of adding it to their Profile. This gives you more granular control, and you can even set it to expire automatically after a certain amount of time.
Standardize Your User Deactivation Protocol
We’ve seen it on an alarmingly consistent basis: employees will try to siphon off as much data as possible as soon as they realize they’re probably about to lose access.
Data is the new gold, and your competitors would probably love to get their hands on all of yours.
To prevent this, the very first step is to go to the User’s record and uncheck the “Active” checkbox. This immediately locks them out.
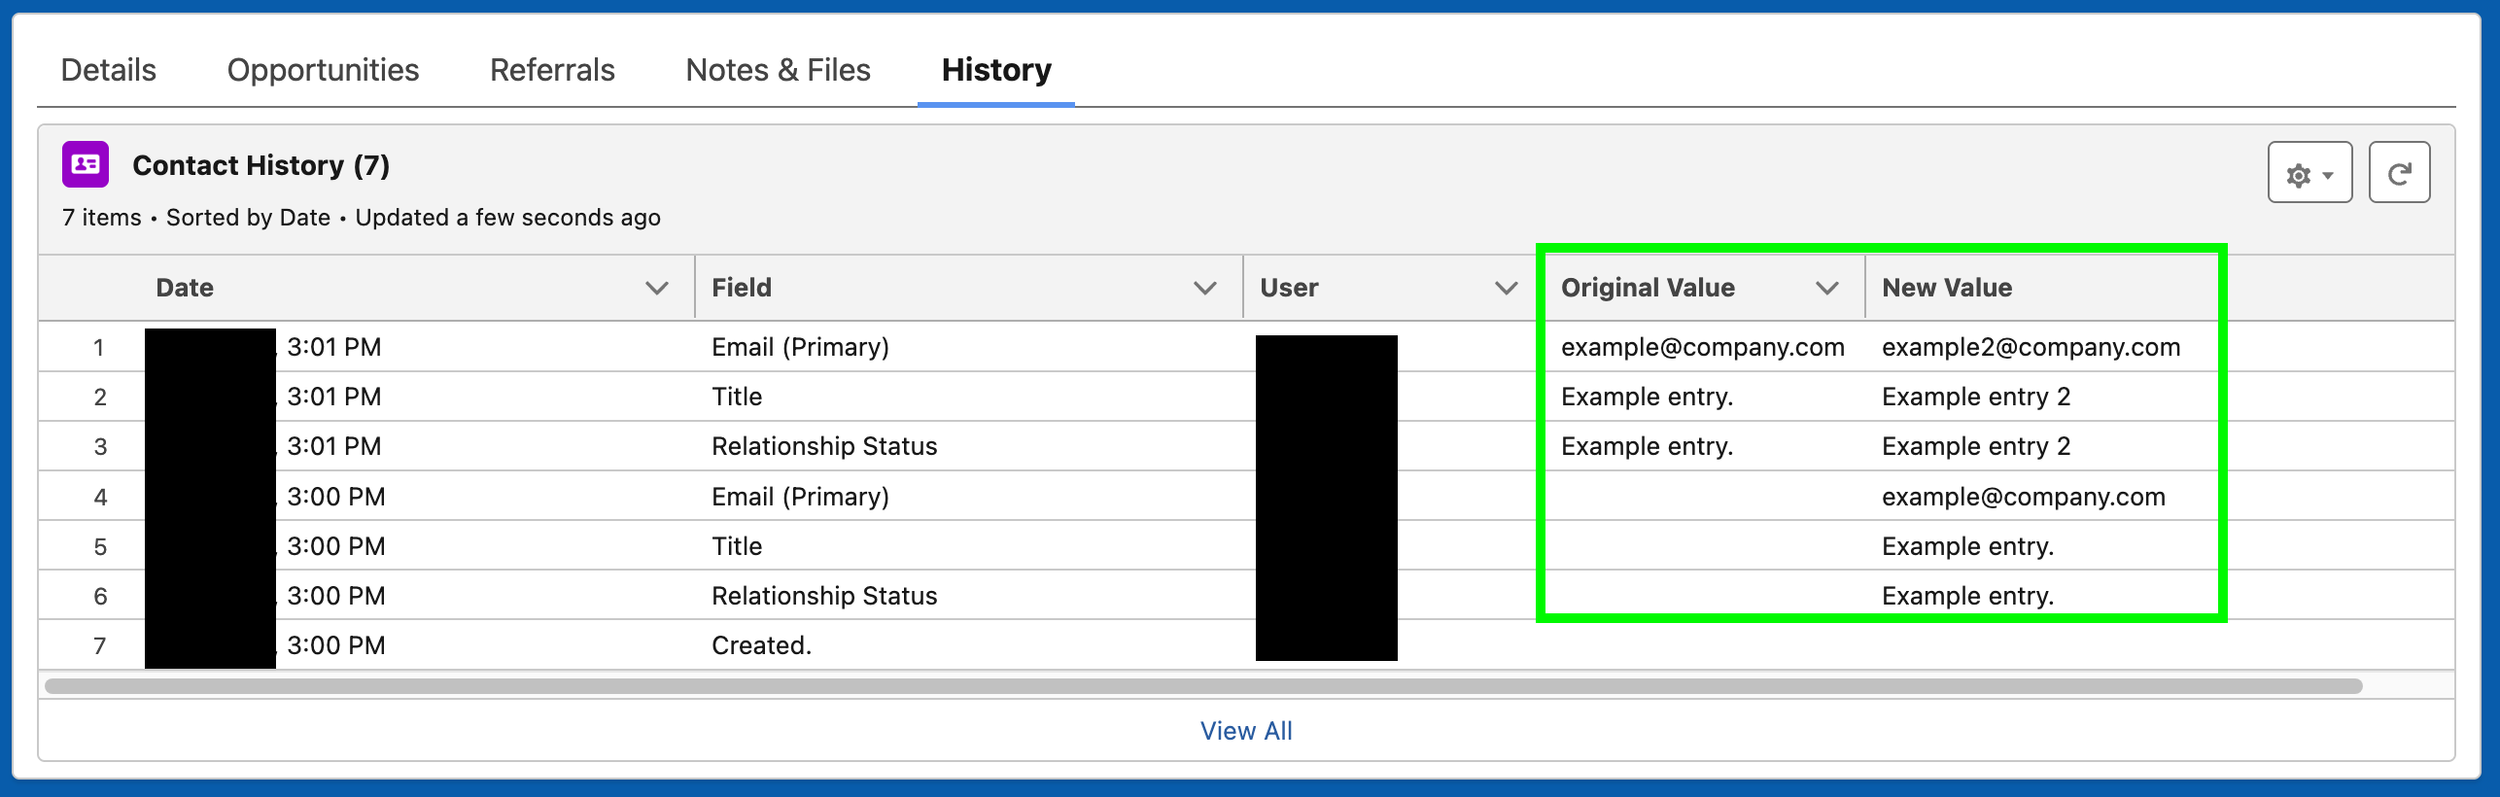
Unlock Field History Tracking for All Used Objects
This will allow you to see who makes edits to fields, when, and what the old and new values are.
For each Object you use, go to Object Manager > Fields & Relationships > click the “Set History Tracking” button in the top right hand corner. Then select up to 20 fields that are the most important, and click Save.
Navigate to Object Manager > Page Layouts > select each page layout that is in use. Click the Related Lists section within the left hand menu of the box at the top of the page. Search for “History” and then drag the component for “OBJECT History” down into the Related Lists section below.
If you don’t see the History related list appear on your record page, navigate to a record > click the Setup gear icon > select Edit Page. Then search for “Related List - Single’ and drag it onto your page. Click the new component and then use the Related List dropdown on the right hand side to select the “OBJECT History” List.
Pro tip: Change the Related List Type to “Enhanced List” and the Number of Records to Display to the maximum amount, 30.
Enforce Multi-Factor Authentication (MFA)
Encourage use of the native Salesforce Authenticator app unless your organization has purchased an alternative.
Leverage Salesforce’s MFA Enforcement Monitor to identify users not yet enrolled.
Go to Setup > Session Settings and ensure MFA is required for all users.
Reference the Salesforce Multi-Factor Authentication Implementation FAQ + Guide as needed.
Restrict Login IP Ranges
Define IP ranges associated with your corporate network and VPN.
Navigate to Setup > Profiles > choose one > Login IP Ranges > update and save. Repeat for all Profiles assigned to an active User.
Check Your Setup Audit Trail Regularly
Navigate to Setup > View Setup Audit Trail
This shows you exactly what settings were changed, when, and by whom.
Pro tip; Use the small link at the bottom titled “Download setup audit trail for last six months” to get a .CSV file of the audit trail.
Upgrade Option: Set up Real-Time Event Monitoring (requires Salesforce Shield):
Go to Setup > Event Monitoring Settings and enable critical event types.
Use Transaction Security Policies to trigger alerts or block behavior:
Setup > Transaction Security Policies > Create New Policy.
User Training & Phishing Awareness
Train users to:
Never share login credentials.
Confirm requests through internal channels.
Avoid clicking on unfamiliar links or attachments.
Emphasize that Salesforce Support will never call to request login information or instruct you to install apps.
Update your Primary Contact
This is the person who will always be notified if something bad happens.
You don’t want it to be an inactive User.
Navigate to Setup > Company Information > Edit > ensure that the user in the Primary Contact field is correct
In General, Always Apply the Principle of Least Privilege
Folks only need access to the functionality that they use to perform their role. Make it the norm that it’s not personal when they are denied access to functionality they don’t need.
Use Permission Sets and Profile Settings to grant only essential access.
Navigate to Setup > Profiles or Permission Sets, and remove unnecessary permissions.
One especially important permission is the ability to manage connected apps, since they can often modify your data.
Go to Setup > App Manager > Connected Apps OAuth Usage and review who has access.
Check the Official Trust Site First If Anything Seems Fishy
First, navigate to Setup > Company Information and search for “Instance”. This is where your data is actually stored.
Then use your Instance number to search the trust site for the latest updates affecting your org.
Pro tip: subscribe for updates.
An Ounce of Prevention
Want to be proactive, but don’t want to go down the settings rabbit hole? Our Wolfpack has done this many times before and is standing by to help if you need it.
Pro tip: Remember that you can also now Ask Salesforce’s Free AI Support Bot your questions! It’ll at least point you in the right direction or help clarify what you need.

